Connect Redshift to Row Zero
Row Zero's built-in Redshift connector makes it easy to connect your spreadsheets to Redshift. Follow the instructions below to connect to Redshift, share your connection with others, and import data to a spreadsheet..
Create username / password connection
Follow the instructions below to connect to Redshift using a username and password.
-
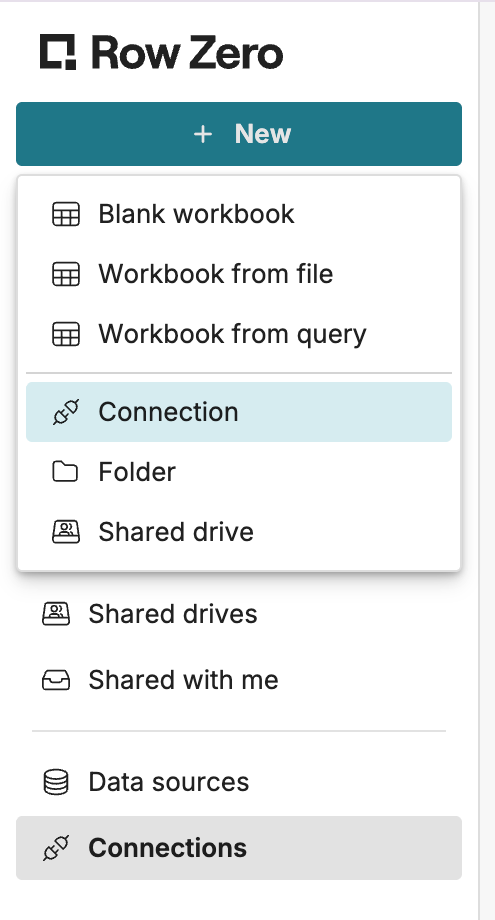
From your Row Zero homepage, click + New in the upper left corner and then choose Connection.
-
Choose Redshift. The Redshift connector requires a few pieces of information, defined below:
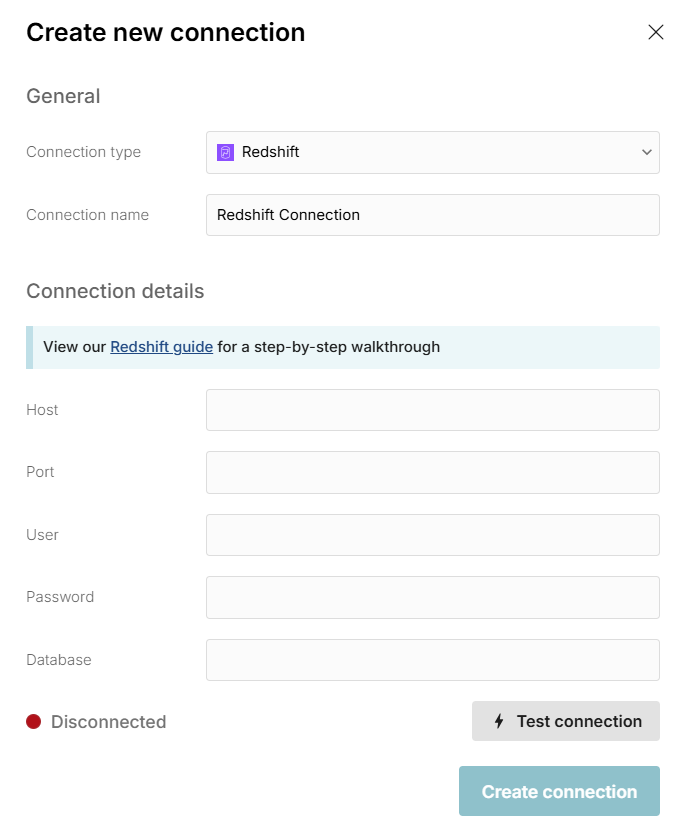
- Connection name - This field can be anything that helps identify the data source being connected (e.g. "Production Data" or "Product Metrics"). It will be visible to all users who have access to this connection.
- Host - This is the Redshift address that typically takes the form of a string like '12345xyz.redshift.amazonaws.com'.
- Port - This is always 5439.
- User - This is the username for your Redshift database.
- Password - The password used to log into your Redshift Database.
- Database - The name of the Redshift database being connected to.
-
Once all the information is entered, hit 'Test connection' to ensure the information is correct. If the test connection icon turns green and says 'Connected', proceed by clicking on 'Create'.
Note - If your database is behind a VPN or firewall, you'll need to allow the Row Zero IP addresses: 18.217.97.112 and 18.224.119.220.

- If you would like other users to be able to use this user/password to query Redshift from Row Zero, you can securely share the connection with them in Row Zero. This is appropriate if multiple users share a service account. To share your connection in Row Zero:
- Navigate to your Connections page.
- Find the Connection that you'd like to share, click '...' next to the name of the connection, and select 'Manage sharing'.
- Enter the emails of the users or groups that should have access to this connection.
Create AWS IAM role connection
Setup an AWS IAM role to connect to Redshift with
-
Login to your AWS console and create a new AWS IAM role in the same AWS account as your Redshift cluster or workgroup.
-
Attach the trust policy, replacing
<EXTERNALID_FROM_ROW_ZERO>with the External ID shown in the Row Zero connection form (see below).{ "Version": "2012-10-17", "Statement": [ { "Effect": "Allow", "Principal": { "AWS": [ "arn:aws:iam::732940336628:role/DataSourceProxyRole" ] }, "Action": "sts:AssumeRole", "Condition": { "StringEquals": { "sts:ExternalId": "<EXTERNALID_FROM_ROW_ZERO>" } } } ] } -
Attach the permissions policy for your cluster type (provisioned or
serverless).-
Serverless Cluster
{ "Version": "2012-10-17", "Statement": [ { "Effect": "Allow", "Action": "redshift-serverless:GetCredentials", "Resource": "arn:aws:redshift-serverless:<region>:<account-id>:workgroup/<workgroup-id>" } ] } -
Provisioned Cluster
  {
     "Version": "2012-10-17",
     "Statement": [
         {
             "Effect": "Allow",
             "Action": "redshift:GetClusterCredentialsWithIAM",
             "Resource": "arn:aws:redshift:<region>:<account-id>:dbname:<cluster-identifier>/<database-name>"
         }
     ]
  }
-
Grant the IAM role the appropriate permissions in Redshift
-
With IAM authentication, Row Zero logs into Redshift as the user
IAMR:<role-name>, where <role-name> is the final segment of your Role ARN (for the ARN arn:aws:iam::123456789012:role/my-redshift-role, the user is IAMR:my-redshift-role). This applies to both provisioned and serverless. Grant database privileges to the IAM user Row Zero logs in as:GRANT USAGE ON SCHEMA <schema> TO "IAMR:<role-name>"; GRANT SELECT ON ALL TABLES IN SCHEMA <schema> TO "IAMR:<role-name>"; ALTER DEFAULT PRIVILEGES IN SCHEMA <schema> GRANT SELECT ON TABLES TO "IAMR:<role-name>";
Configure the connection in Row Zero
Follow the instructions below to connect to Redshift using a username and password.
-
From your Row Zero homepage, click + New in the upper left corner and then choose Connection.
-
Choose Redshift. The Redshift connector requires a few pieces of information, defined below:
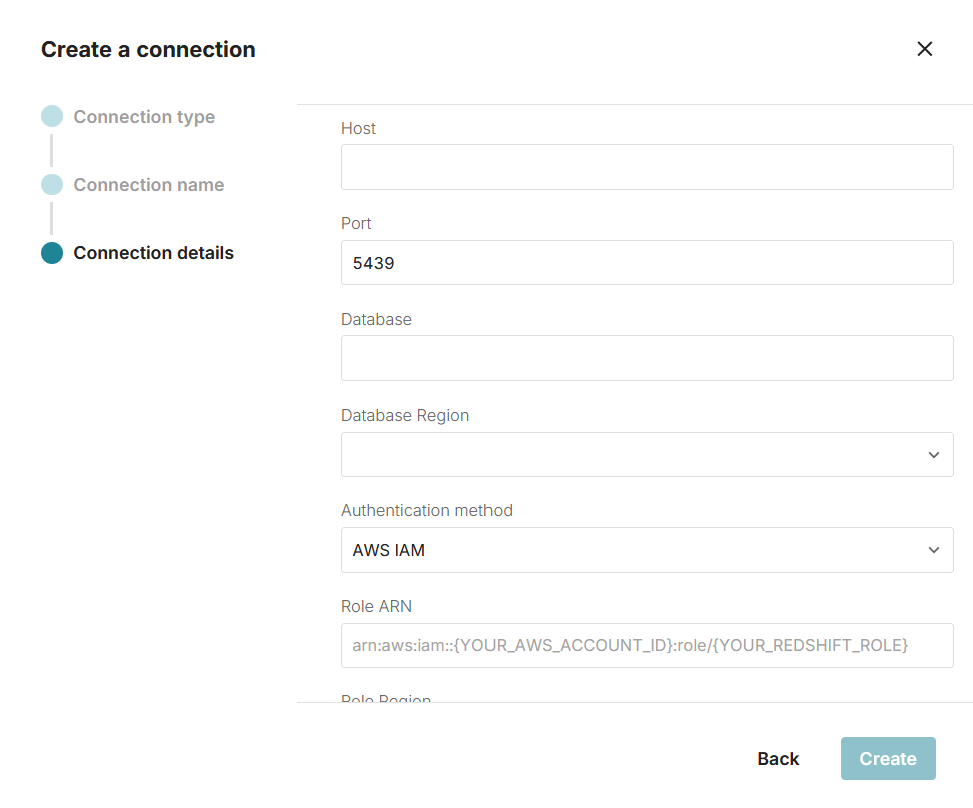
Authentication Mode: AWS IAM - Host - the Redshift endpoint, e.g. 12345xyz.redshift.amazonaws.com
- Port - 5439
- Database - the name of the Redshift database to connect to
- Database Region - the AWS region your cluster or workgroup is in
- Role ARN - the ARN of the IAM role Row Zero will assume, e.g.
arn:aws:iam::<account-id>:role/<your-redshift-role> - Role Region - the AWS region the IAM role of the above Role ARN is in
- Cluster type - Provisioned or Serverless
- Cluster identifier / Workgroup name - the cluster identifier (provisioned)
or the workgroup name (serverless) - External ID - a value generated by Row Zero. Copy it into your IAM role's trust policy (below).
-
Once all the information is entered, hit 'Test connection' to ensure the information is correct. If the test connection icon turns green and says 'Connected', proceed by clicking on 'Create'.
Note - If your database is behind a VPN or firewall, you'll need to allow the Row Zero IP addresses: 18.217.97.112 and 18.224.119.220.
Share your connection with other users
If you would like other users to be able to use this role to query Redshift from Row Zero, you can securely share the connection with them in Row Zero. This is appropriate if multiple users share a service account. To share your connection in Row Zero:
- Navigate to your Connections page.
- Find the Connection that you'd like to share, click '...' next to the name of the connection, and select 'Manage sharing'.
- Enter the emails of the users or groups that should have access to this connection.
Write a query to import Redshift data
Now that have created a Redshift connection, you can import data by writing queries directly within Row Zero. See Data Import to learn how.